INSTALLINg AND USing YOUR KIWIBRAAI
POSITIONING AND INSTALLING YOUR KIWIBRAAI
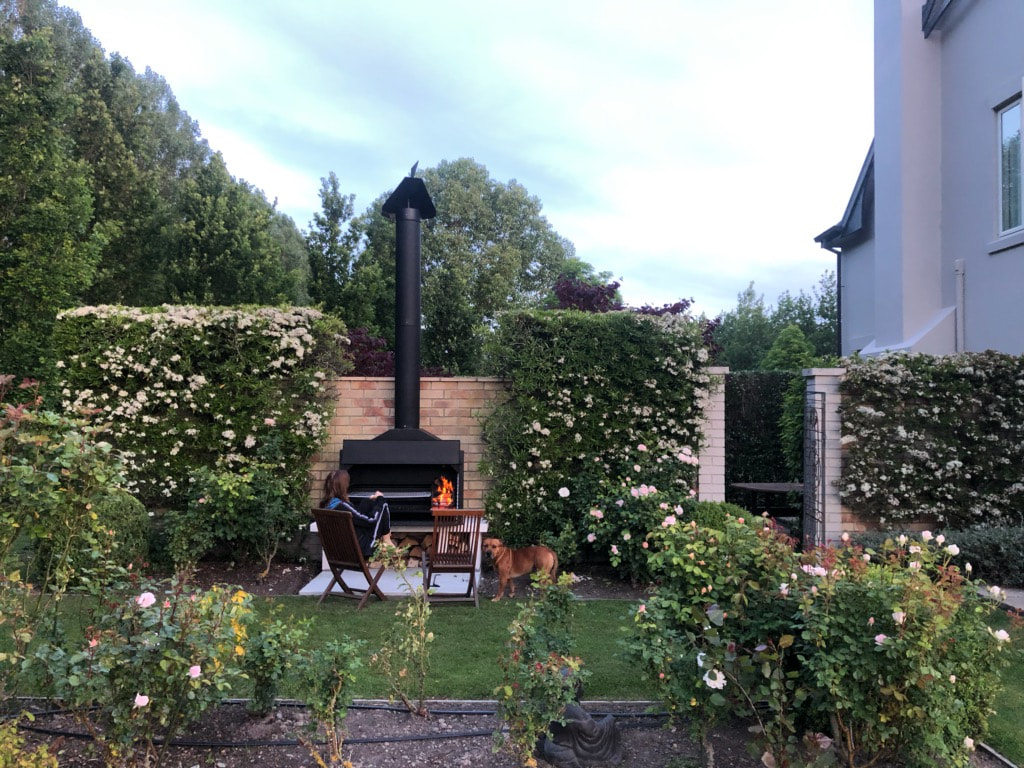
Adding a Braai area can create an entire outdoor room so it is a very important step to consider the positioning of your Braai. Look over your garden for the most liveable spot and wherever you put it, make sure you allow enough level area for dining and for working around the Braai.
We recommend that you have your Kiwibraai before you start any preparation or installation work for it. We find that the most practical height for the Braai is between 550mm and 650mm off the ground as this works best for both cooking and when using the Braai as an outdoor fire. Your Braai can be left as is or can be clad in construction materials designed to complement your particular tastes and decor.
It is highly recommended that you position the Braai on a precast concrete slab or something similar that is equally heat resistant. Firth Concrete Blocks which are readily available and inexpensive provide a simple solution as a pedestal for the slab to be placed on and fixed to.
It is essential that the Braai is secured in place and we suggest two options:
If you decide to clad the Braai, one option is to extend the slab base beyond the sides of the fire box, resting it on the supporting structure. This will then help support the cladding around the fire and the chimney cladding if used. A minimum gap of between 25 to 30mm should be left on the sides and 100mm at the back between the non-combustible cladding material and the Braai. If you are enclosing the Braai entirely, make sure to include vents in the cladding to allow some of the heat to escape. Also take care that any cladding along the lintel doesn’t impact on the ability of the top door to sit back a little bit and stay open when it is used. We recommend hiring a stonemason.
If you are planning on installing your Braai e.g. under some form of roof, in an outdoor room with the flue going through a roof cavity, close to a combustible wall, on a wooden deck or with the flue being contained in some sort of cladding or cavity etc, please note there will be a lot of heat generated from all around the braai i.e. sides, underneath, front (of course) and above and also from the flue. It is therefore very important that your Braai meets the relevant standards. You can find more information on our website in the Technical information area or by contacting us directly.
Adding a Braai area can create an entire outdoor room so it is a very important step to consider the positioning of your Braai. Look over your garden for the most liveable spot and wherever you put it, make sure you allow enough level area for dining and for working around the Braai.
We recommend that you have your Kiwibraai before you start any preparation or installation work for it. We find that the most practical height for the Braai is between 550mm and 650mm off the ground as this works best for both cooking and when using the Braai as an outdoor fire. Your Braai can be left as is or can be clad in construction materials designed to complement your particular tastes and decor.
It is highly recommended that you position the Braai on a precast concrete slab or something similar that is equally heat resistant. Firth Concrete Blocks which are readily available and inexpensive provide a simple solution as a pedestal for the slab to be placed on and fixed to.
It is essential that the Braai is secured in place and we suggest two options:
- Pass a metal strap over the top of the fire box lintel and secure it into the bottom block on each side
- Drill 2 x holes through the base of the Braai and through the concrete slab beneath to secure with dynabolts or similar. Ensure that the holes aren’t near the ash draw as this will create a problem when you insert the ash draw back under the ash pan.
If you decide to clad the Braai, one option is to extend the slab base beyond the sides of the fire box, resting it on the supporting structure. This will then help support the cladding around the fire and the chimney cladding if used. A minimum gap of between 25 to 30mm should be left on the sides and 100mm at the back between the non-combustible cladding material and the Braai. If you are enclosing the Braai entirely, make sure to include vents in the cladding to allow some of the heat to escape. Also take care that any cladding along the lintel doesn’t impact on the ability of the top door to sit back a little bit and stay open when it is used. We recommend hiring a stonemason.
If you are planning on installing your Braai e.g. under some form of roof, in an outdoor room with the flue going through a roof cavity, close to a combustible wall, on a wooden deck or with the flue being contained in some sort of cladding or cavity etc, please note there will be a lot of heat generated from all around the braai i.e. sides, underneath, front (of course) and above and also from the flue. It is therefore very important that your Braai meets the relevant standards. You can find more information on our website in the Technical information area or by contacting us directly.
FLUE & STANDARD COWL ASSEMBLY FOR KIWIBRAAIthere can be some variations to the following....
|
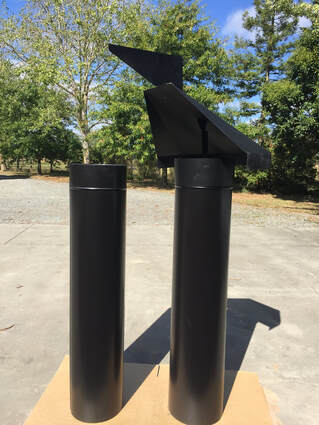
Standard with a Kiwibraai are 2 x 1200mm lengths of flue. Both have a ridge at 100mm down from the top and these ridges are designed for the Cowl base or Static cowl to fit firmly and neatly onto one flue section and then for the upper flue section to then fit easily onto the lower flue section.
Also included are 12 screws - 4 X Hex head Tec and 8 x (10 gauge) Panhead Stainless Steel Screws. Position the flues so that the seams of both are inline. If you struggle to join the flues, as they are a tight fit, lie them down and then ease together. Pilot holes should be drilled prior to assembly. The 4 X Hex head Tec screws are to be used for connecting the flue to the flue flange (top of the Braai). The 4 X (shorter) (10 gauge) Panhead Stainless Steel Screws are for joining the two parts of the Flue The 4 X (longer) (10 gauge) Panhead Stainless Steel Screws are for connecting the Cowl base to top of Flue. Extreme care is needed when lifting the flue onto the gather as the bottom edge of the flue is very sharp and it may be affected by any wind gusts till secured in place. |
|
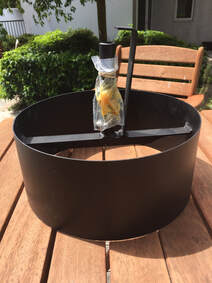
To fit the cowl, place the grease and ball bearing down the cowl base shaft, slide the cowl on then push the lever across which holds the cowl in place.
At a later date, you might experience some squeaking from the cowl. This is easily fixed by removing the cowl, placing more grease in the base, then putting the cowl back. Note: some form of Cowl is necessary to prevent rain from entering the chimney. |
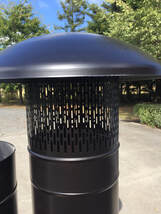
STATIC COWL WITH SPARK ARRESTOR INSTALLATION |
If you have opted for a Static Cowl with Spark Arrestor rather than a Standard Cowl, installation of the Cowl is as follows:
|
THERE IS A LIGHT FITTING WITHIN THE BRAAI.
Due to the heat of the Braai, to be able to use the light, it must be wired using silicon wiring. You will also need to source an incandescent light bulb to use - LED's are not suitable.
FIRST FIRING & GENERAL USE FOR KIWIBRAAI
It is advisable on the first firing to cure the Braai (and brick/ stone work) slowly with a small fire i.e. don’t build a “bonfire” during the first firing – it may damage the Braai (and brickwork). It will seem as if the fireplace is smoking the first time when lit but this is quite normal as it is the paint curing. There will also be some chemical odour, so it’s is advisable not to breath it in but this will disappear after the first couple of fires.
It is also advisable at the first firing to also heat up any cooking grids to remove any residue. If this isn’t done any food cooked on the grids may be tainted.
Always have your fire in the Ember maker and/ or on the Ash pan – never have the fire directly on the bottom of the Braai and do not put your fire out with water as this may damage the fire box.
COOKING WITH YOUR BRAAI
Either start a small fire in the ashpan and build this up or start the fire in the ember box and after it is established, shake the embers down through the ember box and drag them across the ashpan into the cooking area. We have found positioning the cooking rack at the lowest level (i.e. closest to the fire) for steaks, chops, sausages, kebabs, chicken pieces etc.; using the mid setting for roasts, with the doors closed and also topping the fire up with charcoal or wood from time to time to keep the heat up; and for pizzas or slow cooking, using the top setting, again with the doors closed and with most of the heat coming from the ember box has worked best for us. For more braai tips, go to the following website: www.south-africa-tours-and-travel.com/south-african-barbecue.html#GENERAL BARBECUE (BRAAI) TIPS
DISPOSAL OF ASHES
Keep the ashpan clear of ashes when not in use. When removing (cold) ashes from the Braai, we suggest using a metal container with a tight fitting lid and dispose of the ash responsibly. Do not leave the ash draw on a combustible floor as ash can stay hot for days.
THERMOSTAT POSITIONING & INSTALLATION
You may have purchased a thermostat from us. With a tape measure, mark out a spot in the centre of and 55 mm down from the top of the lower door. Use a 10mm drill to drill a hole, then fit the thermostat by screwing into place.
MAINTENANCE
At some stage, on any exposed steel, surface rust may appear and we don’t regard as a serious problem. Normal treatment is to clean off specks of rust with a wire brush/ steel wool/ sandpaper; neutralize the rust; then touch up with heat resistant matt black fire paint. We recommend Wurth saBesto Rust Converter and Wurth saBesto Matt Black Heat Resistant Lacquer Spray Black. Both of these products are available either direct from Wurth or from Kiwibraai.
Inspect the Flue system annually for soot build-up and/ or any other blockages e.g. birds’ nests. Clean the Flue pipe if internal soot deposits are greater than 6mm in thickness.
SUMMARY
Providing your Braai is used the way it was intended to be used and if the areas exposed to the elements are treated as per above, your Braai can last a lifetime.
DISCLAIMER
The suggested installation guidelines represent a general procedure for successful installation of Braai solid fuel barbecues.
Kiwibraai Limited assumes no liability for damages resulting from the improper installation on this application of its products. It is the installer’s responsibility to check for proper installation. It is the user’s responsibility to ensure the use is safe and no property or person is harmed or damaged.
Kiwibraai Limited disclaims any warranty of compliance with legislation, regulations or by-laws specific to installing log burners.
Our suggestions may be followed, modified or rejected by the owner, engineer, contractor, and/or their respective representative(s) since they, not Kiwibraai Limited or its representatives, are responsible for planning and executing installation of the Braai solid fuel BBQ specific to its application. All planned installations should be assessed on a case by case basis in accordance with relevant legislation, safety standards, local bylaws and regulations. We advise you to take specific advice from a suitably qualified professional to ensure installation of your Braai complies with the laws of New Zealand.
Kiwibraai Limited reserves the right to alter the installation guidelines and encourages contact with the factory or its representatives to review any possible modification to the suggested guidelines prior to commencing installation.
Version: 20201016. Subject to change.


