COOKING TIPS & RECIPES
It takes about 15 to 20 minutes to get some embers going and scattered along the bottom of the Braai. We usually cook over charcoal and manuka.
If you are doing steak, allow at least 20 to 30 minutes for the Braai to get hot enough. Have the cooking grid on the lowest shelf to ensure enough heat to cook the steak quickly.
You can cook with the doors open or shut, the fire won’t go out either way. As a general rule for whatever you are planning to cook - If you would BBQ it with the lid up, then cook it in the Braai with the doors open and if you’d cook it in an oven, then cook it with the Braai doors shut. A thermostat (which we sell) fitted onto the lower door of your Braai helps with keeping an eye on the what temperature it’s at.
Roasting is done in a similar manner to how you would roast in a conventional oven – similar temperatures and times. One of the advantages of course is that you can get a lot of roasts in at a time. We usually do our roasts in foil trays with some foil over the meat for the main part of cooking then removing the foil towards the end of cooking.
If you are smoking fish, any of the foil bags and sealed fish smoking units that you heat on a shelf, generally found at the BBQ Factory etc, all work very well.
How to Braai the Perfect Steak
To braai the perfect steak at your own home is one of those things you should be able to do with ease, as long as you stick to a few basic guidelines and pay attention to what you are doing. Make sure the steak you are braaing is of a certain quality as a bad piece of meat is never going to turn out great.
|
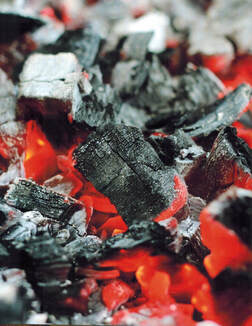
If you are making a real fire with real wood (and this is the best way to braai) make a big fire from the outset. Do not make a medium sized fire and add more wood later, as by the time the second batch of wood has burnt out, the coals from the first catch will be half dead.
If you are only using charcoal, then light quite a lot of it, maybe half a bag. 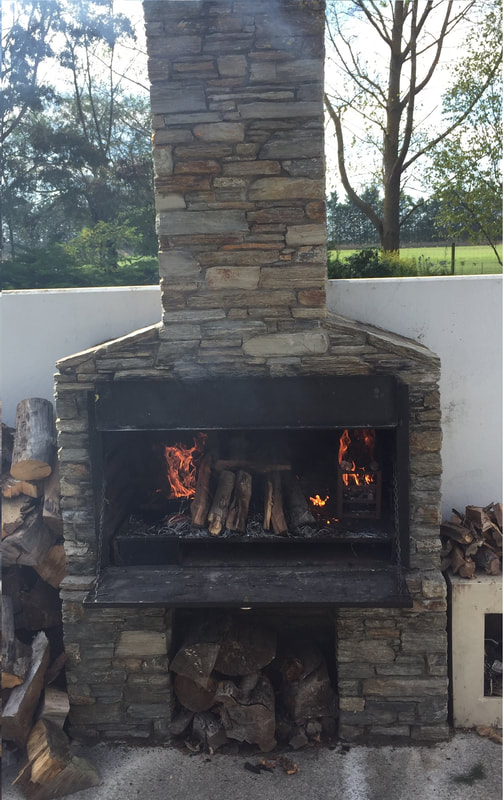
|
you need plenty of hot coals
The steak should be at room
temperature before braaing
Once the meat goes onto the fire, the process will be over quickly.
Steaks should ideally be done to medium rare. The meat should be dry when it goes onto the fire. Do not baste until both sides of the meat have been over the coals for 2 minutes each. The exact height of your grid is not so important, anything between 5 & 15 centimeters is fine. But remember how you do it in case you need to make any adjustments for the next time. |
Take note of the time when you put
the steaks on
Steaks cut to 2.5cm to 3cm, braaied on extremely hot coals & at a grid height of about 10cm should take about 7 minutes for medium rare, broken down into steps as follows:
2 mins on one side, flip, 2 mins on other side, flip, 1 1/2 minutes, flip then another 1 1/2 mins. Remember to rest the meat for a short while to let the juices settle down and not all run out when the meat is sliced. 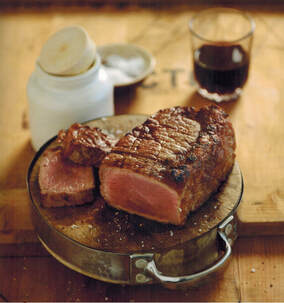
|
porchetta
Stuffed & Rolled Italian Pork Roast

Note: to get perfect crackling, you need to draw the moisture out of the skin. So ideally the roast should be prepared the day before you plan to cook it, up to the point of being stuffed and tied and that way you will have time to salt the skin of the roast and leave it in the fridge overnight to draw the moisture out.
Ingredients
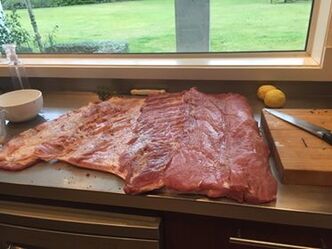
4-5 kg butterflied & boneless pork belly or loin and belly attached, 50 ml sweet dessert wine 6 large carrots 200 ml white wine INGREDIENTS - STUFFING
3 onions 4 cloves of garlic 200g chicken livers zest of one lemon 4 sprigs of fresh rosemary 4 sprigs of fresh thyme 250g fresh breadcrumbs or bread olive oil 400g minced pork 10 fresh sage leaves 120 ml sweet dessert wine 25g pine nuts 40g sultanas (optional) 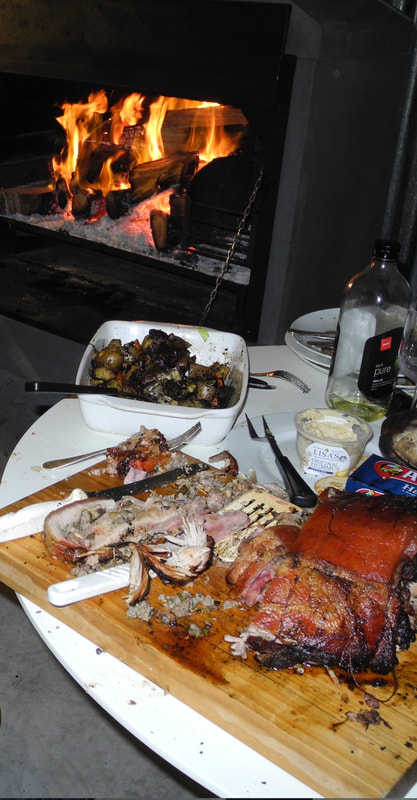
|
DIRECTIONS - STUFFING
Peel and dice the onions, then peel and finely slice the garlic. Roughly chop the chicken livers, then pick and finely chop the rosemary and thyme. Soak the breadcrumbs in water. Sweat the onion and garlic in a good lug of oil in a frying pan for 5 minutes over a medium heat. Add the minced pork and chicken liver, and cook until the pork turns light golden brown. Throw in the chopped herbs and sage and cook for a further 5 minutes. Deglaze the pan with the dessert wine to steam off the alcohol, then take off the heat and add the lemon zest, pine nuts and sultanas (optional). Gently squeeze the water out of the bread and add to the pan. Season and set aside to cool. Using your hands, once cool enough, mix it all together. 
Butterfly the pork belly like a book, rub with the 50ml of dessert wine, some sea salt and black pepper, then pack two-thirds of the stuffing over the centre ½. Now fold both ends into the centre then pack the rest of the stuffing over the surface and fold again.
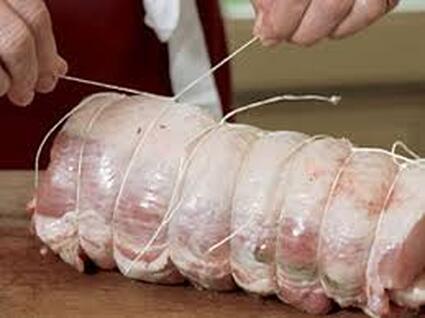
Next, tie up the meat using about 10 lengths of butcher’s string, each about 30cm. Tie very tightly around the middle of the joint, then at either end, about 1cm from the edge. Keep going along the joint until you have used up all the string. The filling should be well tied.
At this stage, if you are preparing the roast for the following day, salt the skin of the roast and leave it in the fridge overnight. Prior to cooking wipe the salt off.
|
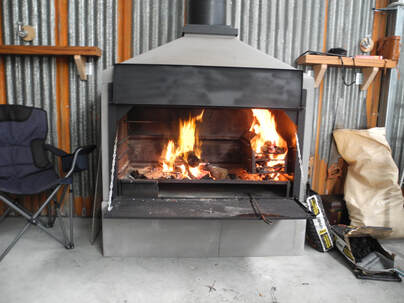
Light the braai at least 45 minutes before you plan to start cooking. Along with wood, you will require 3 to 4kg of charcoal.
If your roast has been in the fridge overnight, bring it to room temperature and wipe the salt off prior to cooking.
Using your hands, massage 1 tablespoon of oil all over the joint, then rub with pepper. Now you are ready to start cooking the roast. You want the temperature in the Braai at about 250C. If there are any pieces of wood still burning, carefully lift these over into the ember box. This will allow you to better control the heat within the braai and below the cooking area (i.e. in the ashpan). First step is to sear the roast and you do this by placing the roast over the cooking grid for about 30 minutes. If the heat gets too much, then reposition the tray higher up on a shelf away from embers. You can also control the heat by pushing in or pulling out the lower door on the hinges to either allow more or less air. Once seared, then place the roast onto a roasting tray, height wise in the middle of the braai. Cook, with the doors shut at between 150C to 250C for about 3 hours. 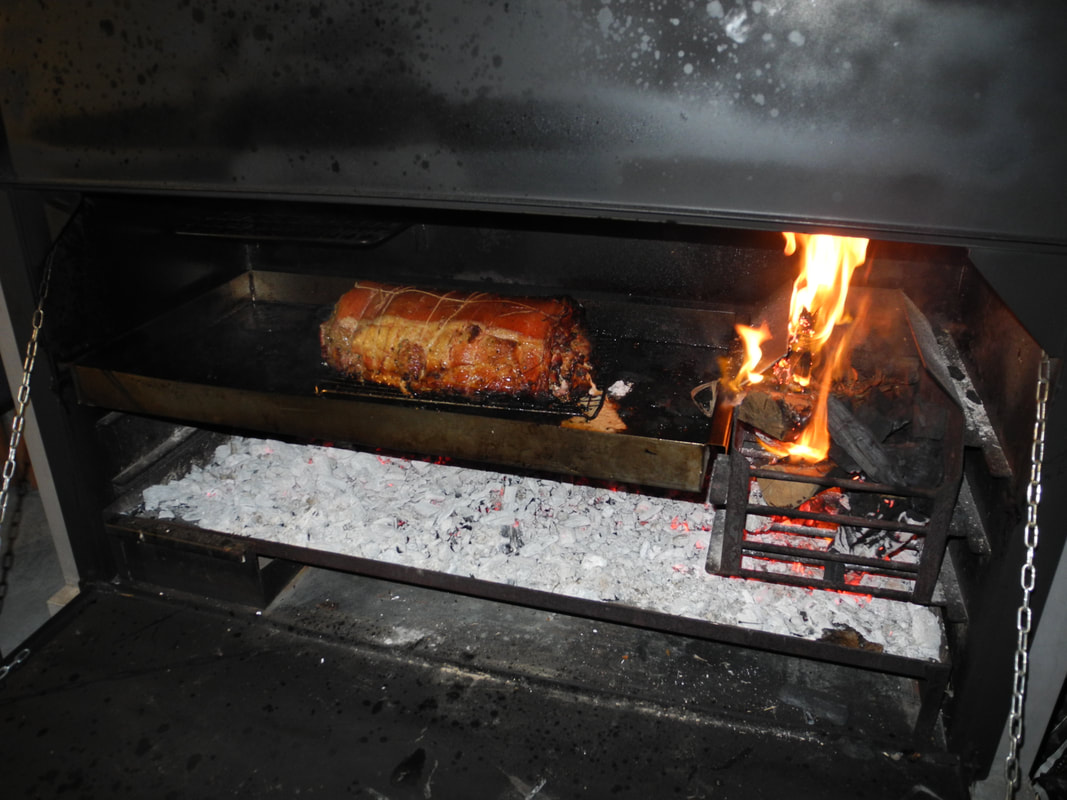
Once cooked, remove the joint from the oven and place on a wooden board and cover loosely with foil, leaving to rest while you make your gravy.
GRAVY (optional)
3 heaped tablespoons plain flour 120 ml white wine 1.5 litres organic chicken stock Skim away the excess fat from the roasting pan and place it over a low-medium heat. Whisk in the flour and let it thicken for 2 to 3 minutes, stirring constantly, then add the wine to loosen. After another 3 to 4 minutes, stir in the chicken stock and continue to cook for 10 minutes. Strain the gravy and serve with the pork, which can be eaten hot or cold.
|
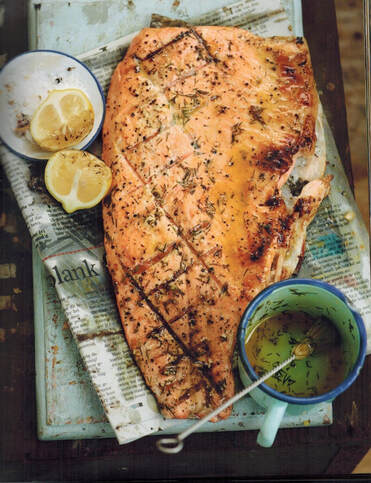
trout fillets with dill butter
Trout is great on the braai, as the smoke from the coals and fire adds a delicious flavour to it. There's no reason to cook it any other way!
|
|
crayfish with garlic-lemon butter
Whether bought or caught, the crayfish should still be alive when you get hold of it.
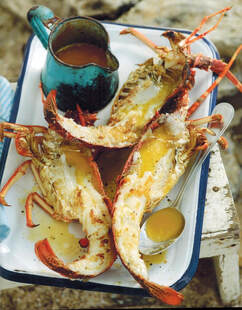
what you need
4 whole crayfish (fresh)
1/2 cup butter 2 garlic cloves (crushed or chopped) juice of 1 lemon 1/2 tsp salt 1/2 tsp pepper |
what to do
Kill the crayfish by inserting a knife between it's eyes.
Prepare the garlic lemon butter by mixing all the ingredients except the crayfish together. On a cutting board and using a sharp knife, cut each crayfish in half lengthways and remove the vein running along the length of the tail.If the vein ruptures during this process, wash the crayfish under cold running water and pat it dry with kitchen paper towels. Braai, flesh side down for 3-4 minutes on hot coals and then turn them over. Now start basting the flesh with garlic-and-lemon butter sauce. |
Now braai, shell side down for another 7-10 minutes - you are aiming for 10-14 minutes in total.
Only add the butter mixture to the crayfish after you have turned them over, with the flesh now facing upwards, so that the sauce will stay in the shell and not go to waste. You won't need to add any additional sauces - the meal will be perfect as is. Don't fiddle with the crayfish while it is braaing. They will not stick to the grid and they are best left alone. 5. The crayfish are ready to eat when all the flesh has turned white and the tail flesh pulls free from the shell when you lift it with a fork - make sure to hold onto the other end with the other hand (or with braai tongs). |
Spanakopita
This classic Greek dish can be braaied very successfully by using mild coals and a hinged grid.
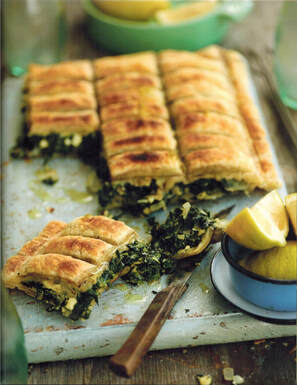
What you need
1 tot olive oil
1 onion 600 g (baby) spinach 200 g feta cheese 4 eggs (lightly beaten) 1 tsp salt 1 tsp black pepper 2 packets puff pastry (400 g each & defrosted). |
What to Do
1. Rinse the fresh spinach thoroughly to get rid of the grittiness, dry to get rid of the excess water, then chop it up.
2. Using your biggest pan, fry the onion in the oil until it's soft and starts to turn golden brown.
Add the spinach - it will wilt down quickly once it starts to cook, then leave it to cook for a few minutes to release any excess moisture and to steam off. 3. Crumble the feta into the mixing bowl, then add the eggs, salt & pepper. Mix well. 4. Unroll the puff pastry and dust each sheet lightly with flour on one side (the side that you'll use on the outside). This will stop the pastry sticking to the grid. If you don't have any flour, then lightly oil the grid. Put one sheet carefully on the inside of a hinged grid. Spoon the filling evenly over the sheet, leaving a border of about 2cm empty. |
Brush the edge with some water.
Now put the second sheet on top of the filled bottom layer. Use your hands to press the edges carefully together so that it seals (the water helps the sheets to stick together). Use a knife or fork to prick a few small holes into the pie so that the steam cab escape while it is cooking. 5. Carefully close the grid, then braai the spanakopita over a medium fire with the grid fairly high for about 20 - 30 minutes until it is golden brown and cooked. Your only risk is burning the pastry so rather go slow than go too fast. As you braai, lift the top half of the grid off the surface of the pastry after every time you turn the grid to make sure the pastry doesn't rise or bake into the grid. 6. When it is ready, carefully take the pie off the grid and put it onto an wooden shopping board and slice into squares or triangles. |
The above recipes are a sample from the recipe books of Jan Scannell (alias Jan Braai) & we have some of these books for sale.